If you’re craving a dessert that’s quick, creamy, and undeniably satisfying, then you’re about to fall in love with this cheesecake ball recipe. Imagine all the rich flavor of classic cheesecake, but rolled into bite-sized balls you can pop straight from the fridge—or dip in chocolate for an extra indulgent touch. Whether you’re planning a party, prepping for the holidays, or just want to treat yourself, these little delights are a no-bake dream.
You don’t need fancy equipment or hours in the kitchen. With just a few simple ingredients like cream cheese, graham cracker crumbs, and your choice of toppings, you can whip up your own cheesecake ball recipe in no time. The best part? You can personalize every batch with fruity add-ins like raspberry or pineapple, or go bold with pumpkin spice or crushed cookies.
This guide provides complete instructions to prepare the best cheesecake ball recipe fresh out of the kitchen, with storage recommendations and answers to all your dessert-related queries. Now you can begin making your next favorite dessert if you have your mixing bowl ready.
Cheesecake Ball Recipe Summary
🧾 Ingredients:
- 8 oz (225g) cream cheese, softened
- 1 cup powdered sugar
- 1 tsp vanilla extract
- 1 cup graham cracker crumbs (plus more for coating)
- Optional add-ins:
- 2–3 tbsp crushed pineapple (drained)
- 2 tbsp pumpkin purée with cinnamon
- 2 tbsp raspberry jam or finely chopped berries
- Optional coatings:
👩🍳 Step-by-Step Instructions:
- Step 1 – Mix Base: Blend cream cheese, powdered sugar, and vanilla until smooth.
- Step 2 – Add Crumbs and Mix-ins: Stir in graham cracker crumbs and any flavor additions (like fruit or pumpkin).
- Step 3 – Shape Balls: Use a spoon or cookie scoop to portion the mixture, then gently roll each piece between your palms to create evenly sized, bite-sized balls—about one inch in diameter.
- Step 4 – Chill: Place on parchment-lined tray and chill in fridge for 1–2 hours until firm.
- Step 5 – Coat and Serve: Roll or dip the chilled balls in your chosen coating. Serve immediately or refrigerate until ready.
⏱ Time Breakdown:
| Prep Time | Chill Time | Total Time |
|---|---|---|
| 15 mins | 1–2 hours | ~1 hr 15 mins to 2 hrs 15 mins |

What Makes This Cheesecake Ball Recipe So Irresistible?
Every individual has sampled numerous desserts however, cheesecake balls stand apart because of their distinct qualities. Each morsel of these small creamy snacks brings out their complete assortment of flavors. The special aspect about this cheesecake ball recipe distinguishes it from all other versions. The combination of three straightforward elements creates an extraordinary sweet experience from ordinary cravings.
Creamy Texture Meets Sweet Flavor
The elegant velvety texture represents the fundamental element of an exceptional cheesecake dessert, and this recipe beautifully achieves it. The cream cheese foundation in these treats results in a smooth custard-like texture that becomes tender when you start to nibble. The snacks present a balanced dessert experience with subtle sweetness and perfect tanginess that delivers authentic cheesecake taste.
Your satisfaction comes from traditional cheesecake, but you enjoy it in an experimental pocket-sized format. The new version of cheesecake targets modern health needs.
No-Bake and Fuss-Free for Busy Days
Baking can produce excellent rewards, yet many individuals prefer ready-made desserts without waiting for the baking process. That’s where this recipe shines. This recipe requires neither oven heating nor managing water baths and avoids the possibility of cooking your dessert too much.. You simply mix, roll, and chill.
Whether you’re putting together a last-minute dessert table or prepping ahead for the week, you’ll appreciate how little effort this takes. The ingredients are common pantry staples, and the whole process takes less than 30 minutes from start to finish (plus chilling time).
Perfect for Holidays, Parties, or Just Because
Because these cheesecake balls are small and customizable, they’re ideal for entertaining. Serve them on a platter with a variety of coatings—chocolate, crushed graham crackers, shredded coconut, or sprinkles—and you’ve got a crowd-pleaser.
But don’t wait for a special event to enjoy them. These are the kind of treats you’ll want to keep in the fridge for spontaneous cravings, late-night snacking, or even as a surprise in a lunchbox. It’s an everyday indulgence with the charm of a holiday dessert.
Endless Variations: Chocolate, Fruit, and More
The greatest charm of this cheesecake ball recipe emerges from its adaptable nature. Having learned the cake’s basic preparation step, you will be ready to move on to different add-ins and decoration techniques. A fruity addition with raspberry jam can be swirled between the base, whereas crushed Oreo bits mixed in for a cookies-and-cream flavor creates a different variation. For another option, dip them in melted chocolate to obtain cheesecake truffles.
You’re not limited to one flavor. With this recipe, you can create multiple batches at once, each with its own personality—perfect for pleasing a group or satisfying your own shifting tastes.
Ingredients You’ll Need for the Best Cheesecake Ball Recipe
Producing a fantastic cheesecake ball requires no elaborate list of ingredients or elaborate shopping. The actual power of this creation comes from basic elements. You already have most of the required staples needed to make this dessert, which produces an indulgent yet thoughtful dessert.

Let’s take a closer look at what you’ll need to make these no-bake cheesecake balls taste unforgettable.
Essential Ingredients (Cream Cheese, Graham Crackers, Sugar, etc.)
The essential base of this recipe relies on full-fat cream cheese. The cream cheese requires softening to room temperature to blend flawlessly for creating cheesecake balls with their luxurious texture. The low-fat version has no place in this dessert section since flavor stands as the crucial factor.
To sweeten the mixture and keep the texture light, powdered sugar works best. It dissolves easily and gives your filling a smooth, velvety finish.
The cracker crumbs from graham bread bring authentic cheesecake flavor to the mixture. The filling contains these crumbs, which are dispersed throughout the mixture or appear as textured coatings on the surface. The choice lies between self-crushed Graham crackers or purchasing ready-crushed Graham cracker bits.
A small splash of vanilla adds warmth and depth, enhancing the overall flavor profile. It’s subtle but essential for giving the cream cheese mixture that classic cheesecake essence.
Optional Add-Ins: Pineapple, Pumpkin, or Raspberries
The creative element comes into play in this section. Crushed pineapple serves both as a tropical addition and a natural sweetener for your dish when used as a substitute for artificial flavors. Make sure to drain the pineapple well to avoid adding too much liquid, which can loosen the texture of the mixture.
For a seasonal touch, you can mix in a spoonful or two of pumpkin purée along with a pinch of cinnamon or pumpkin pie spice. It gives your cheesecake balls a warm, cozy flavor—perfect for autumn or holiday gatherings.
Raspberries create a nice addition for these balls, either when incorporated gently during folding or when used as a layered center. Small pieces of fresh berries should be used for balls to preserve their form.
Coating Ideas: Chocolate Dip, Crushed Nuts, or Coconut
The coating transforms basic cheesecake balls into stunning visual objects. You can use melted chocolate in all its forms as the traditional coating option. You can dip your chilled balls either partially or fully for the truffle appearance.
The addition of crushed pecans or almonds provides both crunch and savory flavor contrast to your dessert.
Shredded coconut, graham cracker crumbs, or even cookie crumbles can be pressed onto the outside for a softer coating with added flavor.
If you’re making a few different versions in one batch, you can divide your coating options and create a mini cheesecake ball sampler. It adds variety without adding complexity.
When you keep the ingredients simple and high quality, this cheesecake ball recipe practically makes itself. Each element plays a role in building that perfect balance of flavor, texture, and visual appeal, without overwhelming you in the kitchen.
Step-by-Step Guide: How to Make Cheesecake Balls at Home
Preparation of the cheesecake ball recipe within your home environment proves simpler than many people anticipate. Creating this cheesecake ball recipe requires basic baking competence and simple tools, together with straightforward components, along with some waiting time and a love of sweet-creamy delights. The step-by-step process will help you create perfect no-bake cheesecake balls that will captivate anyone who tries them.
Step 1: Make the Cheesecake Mixture
Step: You should combine soft cream cheese with powdered sugar and vanilla extract in a large mixing bowl, then mix until the mixture becomes smooth and creamy without any visible lumps. A hand mixer will provide the best mixing performance in this step. Add pumpkin or crushed fruit flavorings only after mixing by gently folding them into the mixture.
Step 2: Add Texture with Graham Crackers or Extras
Step: Once you combine the crushed graham crackers (or cookie crumbs) into the mixture, it will achieve a thicker consistency. The balls achieve their structure through this step. To add more variety in your bites, mix in mini chocolate chips as well as chopped nuts together with small fruit pieces into the mixture.
Step 3: Roll into Balls
Step: Measure small bits of dough by spoon or scoop, then shape them into round balls of uniform size while you use your hands. Each truffle should have a size similar to walnuts or truffles, since they should be consumed in a single or double bite. The stickiness of the mixture requires 10 minutes of cold storage before handling for rolling into shape.
Step 4: Chill Until Firm
Step: Set the completed cheesecake balls onto a baking sheet that you have covered with parchment paper. Refrigeration time ranges from 1–2 hours before the balls become adequate for either serving or coating purposes. The cold temperature strengthens the shape of the cheesecake balls while enhancing their taste.
Step 5: Add the Finishing Touches
Step: Once the balls are chilled, roll or dip them in your chosen coating—melted chocolate, crushed nuts, shredded coconut, cookie crumbs, or sprinkles. Place them back in the fridge for 10–15 minutes if you’ve used melted chocolate so it can set properly.
This process takes very little time, and once you do it once, you’ll find yourself making different variations again and again. Whether it’s for a holiday tray or a casual after-dinner dessert, this cheesecake ball recipe is the kind of treat that delivers maximum reward for minimal effort.
Popular Cheesecake Ball Recipe Variations to Try
This cheesecake ball recipe becomes customizable because you can transform its basic method into countless versions with various holiday or personal preference ideas. Education in the basic method enables you to create multiple adaptations that introduce fresh colors, textures, and flavors to your table. Two simple, creative variations of this cheesecake ball recipe are outlined next.
No-Bake Pumpkin Cheesecake Balls
The seasonal version of this dessert combines all the elements of coziness with just the right amount of spice. Mix a few tablespoons of canned pumpkin purée with cream cheese base while adding both cinnamon and nutmeg seasoning. The transformation of flavor happens instantly through this recipe to create an enjoyable, nostalgic experience suitable for either Thanksgiving or cold winter days. The autumn feel emerges when you coat them with crushed gingersnap cookies or graham crumbs.

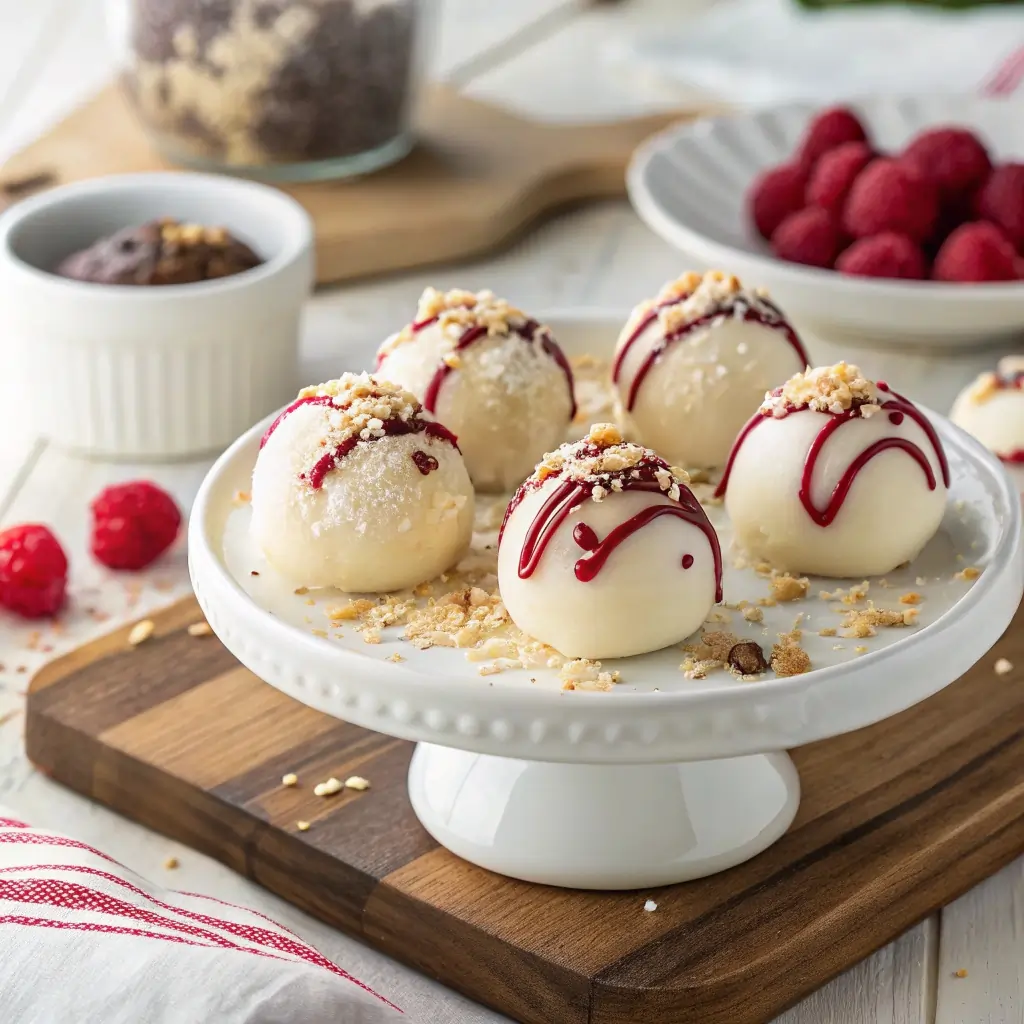
Chocolate Dipped Cheesecake Balls with Raspberries
People seeking an elegant experience will find satisfaction with this model. The filling requires you to mix crushed raspberries or place a mini raspberry whole into the middle of each ball so you can roll it. Feather the balls in melted dark chocolate after refrigeration, since this deep chocolate flavor enhances the fruit experience. After the chocolate solidifies, you obtain a dessert that brings together attractiveness with delicious taste.

Pineapple Cheesecake Ball with a Tropical Twist
The combination of sweet freshness and tangy notes makes this version perfect for hot months and gentle tastes alike. Mix crushed pineapple, which contains no excess liquid, into your moistened base. The pineapple introduces moisture to the mixture, hence, additional graham cracker crumbs should be added for proper texture maintenance. Toast coconut flakes, then use them to coat the finished balls.

Oreo Cheesecake Truffle Balls for Cookie Lovers
The traditional dessert topping of crushed Oreo cookies becomes an ideal component for cheesecake balls as well. People can either include crushed Oreos within their cream cheese blend to create cookies-and-cream stuffing, or they can finish the balls by coating them with cookie crumbs. To make these cheesecake balls more appealing, you should coat them in white chocolate before adding a mini cookie on top.

The endless range of detailed tray-stacked desserts includes these three examples along with numerous other variations. This cheesecake ball base enables easy customization to suit any holiday theme or allows testing new ingredients as well as setting up a dessert bar with multiple coating options and filling choices. People will love this cheesecake ball recipe since it expands depending on what level of creativity they bring to it.
Tips for Storing, Serving, and Customizing Cheesecake Balls
Once you’ve rolled and chilled your cheesecake balls, the next step is knowing how to store them properly, serve them in a way that makes an impression, and customize the flavors to keep things interesting. Whether you’re prepping them for a gathering or saving a batch for later cravings, these tips will help you get the most out of every bite.
How to Keep Cheesecake Balls Fresh and Firm
To preserve their texture and flavor, always store your cheesecake balls in an airtight container in the refrigerator. This keeps them cool enough to hold their shape while maintaining that creamy interior. They can last up to 4–5 days when stored properly, making them a great make-ahead dessert for busy weeks or special events.
If you’re stacking them in a container, place a piece of parchment paper between layers to prevent sticking or smudging. This is especially helpful if you’ve dipped them in chocolate or rolled them in soft coatings like coconut or cookie crumbs.
Can You Freeze Cheesecake Balls? Yes, Here’s How
Yes, these are freezer-friendly—especially if you want to prepare them in bulk or save some for another time. After shaping the balls (but before dipping or coating), place them on a baking sheet and freeze for an hour until solid. Once frozen, transfer them to a freezer-safe bag or container.
They’ll keep well for up to a month. When you’re ready to serve, let them thaw in the fridge overnight. If you want to add a chocolate coating, it’s best to do that after thawing so the texture remains smooth.
Creative Topping and Flavor Ideas for Every Occasion
The base of this cheesecake ball recipe is intentionally neutral, giving you a blank canvas for flavor experimentation. Here are a few simple ideas to help you switch things up depending on the season, event, or mood:
- For holiday gatherings: Roll in crushed peppermint or red-and-green sprinkles.
- For a summery twist: Mix in lemon zest or swirl with fruit jam.
- For chocolate lovers: Use cocoa powder in the base and coat with melted chocolate or chocolate shavings.
- For a nutty finish: Roll in chopped pecans, almonds, or hazelnuts.
You can also play around with extracts like almond, coconut, or hazelnut to subtly shift the flavor without changing the structure. Even something as small as switching from graham crackers to crushed chocolate cookies can make a big difference.
This flexibility is what makes the cheesecake ball recipe such a reliable go-to—you can customize it endlessly without having to rethink the entire process.
FAQ – Cheesecake Ball Recipe Questions Answered
Q: Can I use whipped cream instead of cream cheese?
A: Whipped cream alone won’t give the structure needed for cheesecake balls. Cream cheese is essential for the texture and flavor, though you can fold in whipped cream to lighten the mix slightly.
Q: How long do cheesecake balls last in the fridge?
A: Stored in an airtight container, cheesecake balls can last up to 4–5 days in the refrigerator without losing flavor or texture.
Q: What’s the best chocolate to use for dipping?
A: Semi-sweet or dark chocolate works best for dipping. It creates a rich coating without overpowering the cream cheese base. Be sure to chill the balls first before dipping for a clean finish.
Q: Are cheesecake balls freezer-friendly?
A: Yes. You can freeze them before dipping or coating. Freeze in a single layer, then store in a sealed container for up to a month. Thaw in the fridge before serving.
Q: Can I make a dairy-free version of this recipe?
A: Absolutely. Use a plant-based cream cheese alternative and check that all your other ingredients are dairy-free. The consistency might turn out a bit different, but the flavor remains just as satisfying.
Q: Are cheesecake balls easy to make with kids?
A: Yes! Kids can help roll the mixture into balls and add coatings. Just be sure an adult handles the mixing and any chocolate dipping for safety.
Conclusion
The simple nature, coupled with the versatility of the cheesecake ball recipe, becomes evident to you at this point. Only basic ingredients, along with brief preparation time, enable you to make creamy desserts that entertain your loved ones and impress their eyes and taste buds. Cheesecake balls are suitable for any preference since you can make them traditional or flavor them with pumpkin, raspberry, or Oreo.
Cheesecake balls fit perfectly for all occasions, including special holidays or birthdays, or to handle sudden guest arrivals. These no-bake cheesecake balls enable time savings yet provide the complete indulgence of typical cheesecakes.
You will find the cheesecake ball recipe to be your forever dessert because it enables effortless sharing while delivering reliable results.
Chef’s Note
Room-temperature cream cheese produces the smoothest texture when you start your baking process. Your mixture will blend without difficulties while preventing the formation of lumps by using room-temperature cream cheese. Set your mixture aside in the refrigerator for 10 to 15 minutes if it becomes soft before rolling, because this will allow it to solidify enough for shaping.
The game requires getting ahead of it? Preparation of the base can start one day ahead, while it stays cold until you want to decorate and roll it. The dessert works well for early preparation, which makes it suitable for any event.
You should use your hands as the main instrument to shape your desserts, while your personal creative touch will transform this basic recipe into a dish that solely belongs to you.
We’d love to hear from you! Your reviews help us grow and bring you even better content. Share your thoughts and let others know what you think. 🌟 Leave a review today! 🙌
There are no reviews yet. Be the first one to write one.